Pages

Thursday, March 29, 2012

Differentiating between Test and Production Environments

Being able to distinguish between a test and production environment can be quite important. Often times you may be working in both simultaneously with the obvious potential to get mixed up which may cause undesired results.

This is easy enough to deal with and there are a number of simple solutions out there that involve making an unsupported changes to the CRM style sheets. And if this works in your case then great.

However one of the benefits of multi-tenancy (the likes of which CRM 2011 provides more so than 4.0 since the latter's professional edition did not allow for multi-tenancy whereas it is accomodated in the corresponding 2011 version) is that it is very easy to set up a test or development environment. The best case scenario is to always have a test or development environment on a completely separate server. If that is the case then the method of differentiation referenced above works fine. But smaller CRM installations do not often have the benefit of the additional hardware and therefore having the option of creating another environment by just creating a new organization on the same server is a good solution.

In this case - as far as I'm aware - using the method of differentiation listed above will not work since all the organizations run on the same physical hardward and therefore style sheet edits will affect all organizations running on that server.

Furthermore if you are using CRM Online you obviously cannot make such changes so that option is not available. That is unless you decide to create an on premise test environment in this case. However if you decided to have an online test environment then you are going to be out of luck. It would be nice if Microsoft provided a few different skins for CRM that could be selected in the system settings as a way of dealing with this issue. I'm guessing it won't be very long until we have that option (it kind of jives with Microsoft's latest rollup theme of CRM Anywhere... at least to me).

But until then, one way of getting round this is to use the Application Ribbon to publish a very conspicuous icon that will appear on every form, home page, view, and advanced find form as illustrated below.


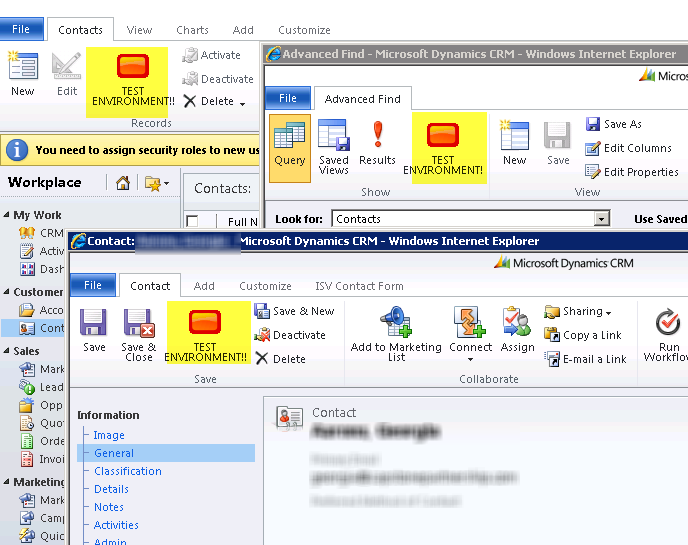
This approach is not only supported (as opposed to the unsupported CSS edit) but it can be applied in all implementation scenarios.

The downside to this approach is twofold:

  1. If you have customized the Application Ribbon as part of your installation then you would have to merge any changes into your test environment. Conversely if you enhanced the Application Ribbon in your test environment you would need to remember to remove these icons before publishing to production. The Application Ribbon is arguably a relatively seldomly used area of customization (as it's globabl in nature - you are more likely to want to make ribbon changes in specific entities which you would do in the entity customization) so it might not affect you. Even if it has been customized - unless it contains critical functionality or functionality that you are immediately testing or enhancing - it may not be necessary to always be completely up to date in your test environment.
  2. Whenever the test environment is refreshed you will need to re-import this solution as a post refresh step. Not a very onerous task (unless a merge is necessary as per #1).
If the issues listed above do not affect your installation, then this approach might work for you. You can download this solution from here. Use at your own discretion.

Wednesday, March 28, 2012

Read only URLs cannot be opened

There is this annoying little issue whereby read only URLs on a CRM form cannot be opened. There really seems to be no rhyme or reason for such behavior as a URL by definition takes the user out of the context of the form and therefore I cannot fathom why such an action should be prevented.

The alternative is to make the field editable but that might not be an attractive alternative especially if you do not want this field to be updated!

I came across an interesting solution for this whereby you can keep the field editable but just remove the option of, ...well..., editing the field. To me it just seems like a different way of making a field read only that doesn't suppress the ability to open the link. And that works for me...

To do so, leave the field editable on the form and place the following line in you onload form jscript:

document.all.websiteurl.contentEditable = "false";

Replace "websiteurl" with the URL field you are working. The result is that the field appears editable on the form but if you try and edit, you will not be able to. Double clicking on the field will launch the URL specified.


I do not think this is supported script so use discretion in applying.

Tuesday, March 27, 2012

Views and Filters Toolkit

This codeplex project provides some very useful tools for manipulating views in MSCRM. Documentation of the various scenarios that this tool can handle is available in the code plex page and there is also ample documentation and use cases in the creator's blog.

For example, this can come in handy if you wish to push out and maintain a set of views to user groups. That is, similar to system views but rather than publishing organization-wide you can use this tool to push it out to a select group of users, department, business unit etc. Of course you could also achieve this by sharing a personal view with a list of users or teams - this therefore provides another option for achieving a similar objective. The main difference would be that although sharing would essentially share one view with multiple users such that if any of those users changed the view definition it would update the definition for everyone, whereas the tool would create an individual copy for each. There might be reasons for using both approaches although sharing would probably be the better approach most of the time.

One of the most useful features is the ability to centrally control the Outlook Filters. I say this with a bit of a caveat which will be explained at the end of this post (before going through the configuration steps you may want to review that caveat). By default Outlook Filters are configured individually on the user's desktop. So if you need to modify the default Outlook or Offline filter, you will need to modify the filter on each computer individually. This has long been a pet peeve of mine.

With this toolkit, you can define locally the Outlook download rule and deploy it globally (or targeted to users, teams etc.). The basic deployment scenario is as follows:

  1. Define your personal view
  2. Create a workflow that looks something like the screenshot below (refer to the detailed instructions for specific settings, although the only information that you'll need to change to make this work will be the values for Personal and System View Name to match the names you have used)
  3. Manually run this workflow on the users to whom you wish to copy the view


Once you have done so, you will now find the view that you defined copy to the "System Filters" tab in the user's Outlook Filters (and/or Offline Filters depending on your deployment scenario).


Works like a charm, doesn't it? Well almost... and here comes the aforementioned caveat. There is a fatal flaw based on my experience that I'm currently working with Microsoft support to fix.

The issue seems to be that while you can use the system view, the default "My Outlook Contacts" view is still required. To quote from Microsoft support:

As I have found in other instances, when the My Outlook Contacts filter is disabled or deleted, it will cause contacts to lose their GUIDs and will also break the crmLinkState. Therefore, in order to guarantee that contact sync properly between CRM and Outlook, the My Outlook Contacts  filter must be present and enabled.

Which for all intents and purposes negates the efficiences gained from using the System Filter approach - at least as far as I can tell. If anyone has a different perspective on this and has found that it does work in their environment I'd love to hear about it.

Update: This issue seems to be confirmed by this post and was resolved with UR5.

So what's the point of blogging about a feature that essentially doesn't work?

  1. It would appear based on the referenced post that this feature can be leveraged and this post serves to point out the issues encountered that might perhaps give a heads up to others who might be looking to configure this option and/or troubleshooting Outlook sync issues.
  2. I have to believe that this is something that will be plugged in the near future and I'm tracking it closely (and giving the support folks a little bit of a hard time) in order to facilitate resolution and therefore wanted to document while it's still relatively fresh in my head. And once fixed this post can serve as a reference to a working function.

One last thing to mention is that it would also be nice to be able to globally deactivate the default "My Outlook Contacts" as even with a working solution there is still a manual step to go into the client and disable the rule so it doesn't interfere with the deployed system rule. Perhaps that can be done using the toolkit - I haven't looked into it. Will try to do so once this issue is (hopefully) resolved.

Monday, March 26, 2012

Adding Images to the Form Header

In keeping with the theme of contact images we will explore how the image can be added to the header section of the contact form in order to illustrate how images can be added to the header section. Although the image can be added to the form body, the issue is that it is of course a scrollable area and therefore it scrolls out of view when you scroll down on the page. On the flip side, the image can take a sizeable chunk of real estate so you may not want to display when the form first loads and instead "hide" it in a collapsible section so that the user can expand the section to view the image. But this is also not ideal.


A better solution might therefore be to have the contact image display in the header section of the form (or perhaps footer) so that it remains in view as long as the form is open as illustrated below.


There are probably other ways of configuring this option (e.g. html page web resources), but I ended up using an IFrame.

Add an IFrame to the header section with the following settings:


Then in the form onload jscript pass in the URL that points to the image. You can obviously build the URL dynamically based on your needs. I don't believe there is currently a way to access the header elements via the standard Xrm navigation, so you can do so using document navigation:


document.getElementById("IFRAME_Image").src = url;

Web Resource Utility use case

In light of my previous post, I thought I'd give a use case for the Web Resource Utility.

In CRM 4.0 we implemented a customization for contacts such that an image of the contact would be present on the contact form. This was done by referencing files on the file server. Although it's possible to do it the same way in 2011 a better approach is to have the contact images stored as web resources (for example, ease of access for remote users).

The question therefore was how to go about uploading all the files from the file server as web resources. Doing it manually would take way too long... Enter the Web Resource Utility.

Basically, all that is necessary is to point the Web Resource Utility to the folder containing the image files and click upload. Well, at least in theory...

One of the issues faced was that the image files contained spaces in them and the Web Resource Utility did not accept spaces...


One option would be to update the source code of the Web Resource Utility as we of course have access to that. Another option, would be to manipulate the files to remove the spaces using a file multi-renaming tool such as the one shown to replace all cases of " " with "_" (underscore).


And subsequently the files can be uploaded using the Web Resource Utility -

One other slightly painful feature of the Web Resource Utility is the presence of the leading "/" for the imported file names.


Once again, the source code could be updated to remove this but for the time being I've decided to live with this as is. The end result is that we have managed to bulk upload hundreds of images without breaking a sweat.


Thursday, March 15, 2012

Web Resource Utility for Bulk Upload

In the old days of 4.0, it was quite a simple matter to add custom icons to custom entities by simply uploading the files in the entity customization area thereby sprucing up your CRM installation by having more different icons for different entities rather than the default drab-looking widget icon.


This is of course still possible in CRM 2011 but now the icons need to be added as web resource which - although an overall better design - it tends to add quite a few more steps to this simple requirement.

Luckily Microsoft has provided the Web Resource Utility as one of the tools that forms part of the CRM SDK which can be compiled and use to bulk import web resources.


If you prefer to avoid the compilation step you can download a compiled version from here.

You can then use this utility to bulk upload web resources into your CRM installation and then just reference them as necessary.

You can of course use this utility to upload any type of web resource although images are probably going to be the most likely.

See the following post for a review of how to connect to a CRM Live instance using this tool.

Wednesday, March 14, 2012

The product key is not compatible with the installed version of Microsoft Dynamics CRM

I encountered this error message while recently trying to apply a permanent license key to a CRM installation.


The error message was clearly wrong because the license key was for the same version as the trial license.

The solution was to essentially ignore this error message. And the way to do so was to add a registry setting that instructs the installation wizard to ignore the errors arising out of the pre-installation systems checks and allow you to click "Next" to kick off the installation. This allowed the new license key to be updated without any side effects to the CRM installation.

The steps required to do so can be found here.

Tuesday, March 13, 2012

Pending Update Contact Icon

After installing the CRM Outlook client you will have no doubt have noticed the CRM icon that gets associated to CRM contacts, emails, appointments etc. which is very useful to be able to determine visually that the record in question is in fact linked to CRM.

However you may have also noticed a contact icon that looks somewhat similar to the regular contact icon except that it has a little dot (clock?) in the bottom right hand corner. At first you may not even notice it but subconciously it will probably nag at you where you may feel that something seems amiss but you can't quite put your finger on it. Well that's kind of what happened to me....


... until I determined that in fact it was a distinct contact icon from the default contact icon. But then I was wondering whether it was CRM related or perhaps just something that I hadn't noticed before in Outlook. It certainly doesn't seem to have the appearance of being CRM related so initially I attributed it to something that I hadn't noticed before as part of Outlook behavior. But then the nagging question was - what did this similar-but-different icon denote? After all, there must be a reason for this variation...

In the end, it turns out that this in fact related to CRM. After you have made an update to a CRM contact and that update has not yet been synced to CRM, the contact will show with this icon. And once synced it will of course revert back to the standard CRM icon. So this icon indicates that limbo period between update and server sync. And I guess that little dot is indeed meant to be a clock...

Why this icon shows as a standard Outlook contact icon with a minor variation rather than the CRM Outlook icon with a minor variation (as it is very much still a CRM contact and it would be much clearer if it was depicted in this way) is a little beyond my understanding... But at least I now know what it means.

CRM 2011 and SharePoint Online integration

Until fairly recently (around the end of November) the ability to integrate CRM 2011 to SharePoint 2010 was limited to the on premise version of SharePoint. Which precluded SharePoint Online (as part of Office 365). Now this limitation has been overcome - you can see Microsoft's announcement here.

Configuring the SharePoint Online integration is actually a simpler affair than it is with the SharePoint On Premise version as much of the prep work is already incorporated to allow the solution to be uploaded (HTC extension scripts, permissive File Handling settings etc.). Essentially you can skip the section on "Add .htc extension to the list of the allowed file types" in the installation instructions (for configuration of the SharePoint Online version).

The only gotcha I experienced was in being able to make the "Upload Solution" appear. After navigating to Site Settings | Solutions, the resulting form told me to click "Upload" but I could not actually see an upload option anywhere.


This problem is solved simply by clicking the checkbox next to the name at which point the ribbon shows with the "Upload Solution" option. Not overly intuitive...but it works. Aside from this, the rest was pretty much plain sailing.

Monday, March 12, 2012

IFD Sign In Prompt for Dynamic Excel Exports

If you have set up IFD (internet facing deployment) within your organization and you attempt to export to a dynamic worksheet, you may be presented with the IFD Sign In prompt (see screenshot) presented in the CRM spreadsheet rather than having your data auto export to Excel.

If this happens, first try and navigate to the Data tab in Excel and click the "Refresh from CRM" icon. If that doesn't work, try with the "Refresh All" option.


If this still doesn't work, then do as follows:

  • On the Data tab click Connections to open the "Workbook Connections" window
  • Click Properties
  • Click the Definition tab
  • Click "Edit Query"
  • Enter your credentials

After authenticating do as follows:

  • Click Ok on the Error window (after entering credentials)
  • Click Cancel on the Edit Web Query window
  • Click Ok on the "Connection Properties" window
  • Click Close on the "Workbook Connections" window

After having performed these steps, try to refresh once again first using the "Refresh from CRM" icon and if that doesn't work, click "Refresh All" and your data should appear.

I am not currently aware of a permanent solution for this issue.